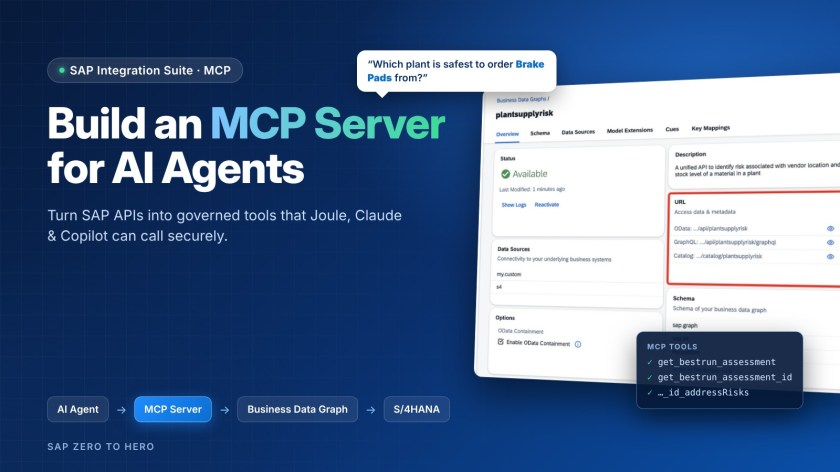
Hi guys, today I would like to share a hands-on guideline about building an MCP Server on SAP Integration Suite, so that AI agents like Joule, Claude or Copilot can use SAP data as “tools”.
AI agents are becoming a new kind of user for SAP systems. The question for integration teams is: how do we let an agent read S/4HANA data without rewriting APIs, without handing backend credentials to the agent, and still keep control of who calls what?
In Integration Suite, we now have the MCP Server artifact. By combining it with Business Data Graph and Developer Hub, we can expose only the operations we want as tools, protect them with policies and publish them for agents to subscribe to.
In this blog I go end to end: combine 4 APIs into one Business Data Graph, turn it into an MCP Server, publish it on Developer Hub, test it with MCP Inspector and finally ask questions in natural language from Claude Desktop.
OVERVIEW
What is MCP?
MCP (Model Context Protocol) is an open standard that lets AI agents discover and call tools by themselves. Each tool is one specific operation, for example “list plants” or “get the risks of a location”.
Why put MCP in Integration Suite?
| Criteria | Agent calls the API directly | Agent calls via Integration Suite MCP Server |
|---|---|---|
| How the agent understands the API | Custom prompt or code for every API | Agent reads the tool list and descriptions via MCP |
| Security | S/4 credentials live on the agent side | Agent only holds a Developer Hub OAuth token; backend credentials stay in the destination |
| Scope | Sees the whole API | Sees only the selected tools (e.g. read-only) |
| Backend protection | None | Quota, Spike Arrest, payload validation |
| Governance | Every agent connects differently | Catalog on Developer Hub, subscription per agent, central monitoring |
Business scenario
A buyer asks the agent: “Which plant has low transport risk and still has Brake Pads in stock?” To answer, the agent needs plant, stock and business partner data from S/4HANA plus a third-party location risk API.
MCP fits lookups and single actions started by a user. Master data sync, batch jobs and mass updates should still run as iFlows. Start with read-only tools; write tools need user confirmation and tight authorization.
PREREQUISITES
- BTP PAYG, subaccount with Cloud Foundry enabled
- SAP Integration Suite subscribed, role collection
Integration_Provisioner - Capabilities Cloud Integration, API Management (with API Composition) and Developer Hub activated
- MCP Server is only available on the FreeTier, Standard, Enterprise plans
- Node.js 18+ to run MCP Inspector locally
CONFIGURATIONS
Prepare Integration Suite
▸ Activate Integration Cell
Go to Integration Suite → Settings → Runtimes → Integration Cell → Activate. SAP provisions the runtime for you, no Kubernetes work needed.
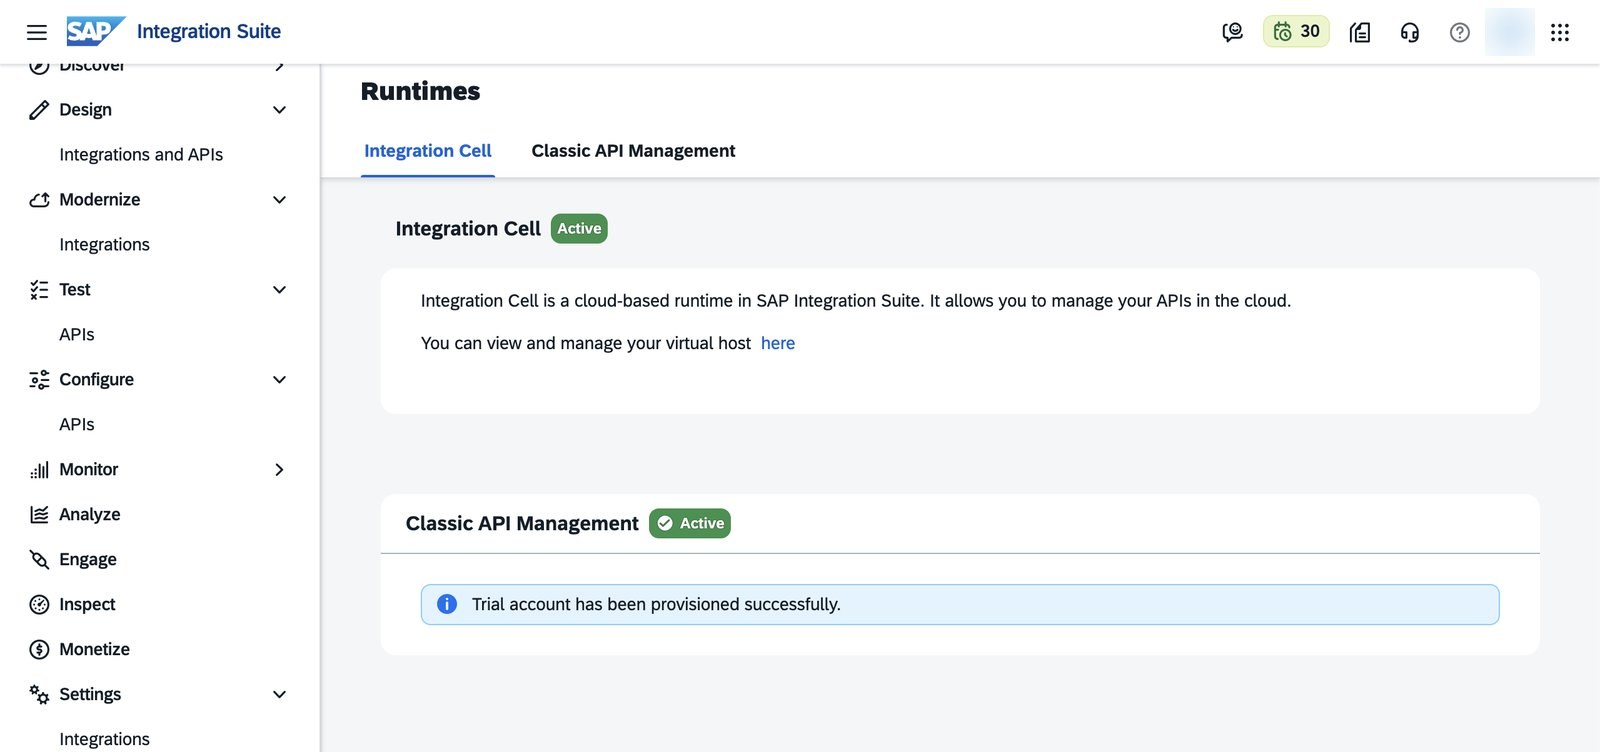
If you get Activation Failure, do not click Activate again and again. Check KBA 3769634. For API Composition supported regions, check SAP Note 3338820.
Build the Business Data Graph
▸ Create destinations to the source APIs
SAP hosts 4 public mock APIs for Trial (plant, material stock, business partner, location risk). In BTP Cockpit → Connectivity → Destinations → Create, create the 4 destinations below. They only differ in Name and URL:
| Name | URL |
|---|---|
LocationRisk | https://api-composition-plant-material-risk.cfapps.eu20-002.hana.ondemand.com/location-risk/ |
S4_API_MATERIAL_STOCK_SRV | https://api-composition-plant-material-risk.cfapps.eu20-002.hana.ondemand.com/material-stock/ |
S4_sap-s4-ce-plant-0001-v1 | https://api-composition-plant-material-risk.cfapps.eu20-002.hana.ondemand.com/plant/ |
s4hana_api_business-partner | https://api-composition-plant-material-risk.cfapps.eu20-002.hana.ondemand.com/business-partner/ |
All other fields are the same for the 4 destinations:
Type: HTTPProxy Type: InternetAuthentication: NoAuthenticationAdditional Property: IntegrationCell.Include = true
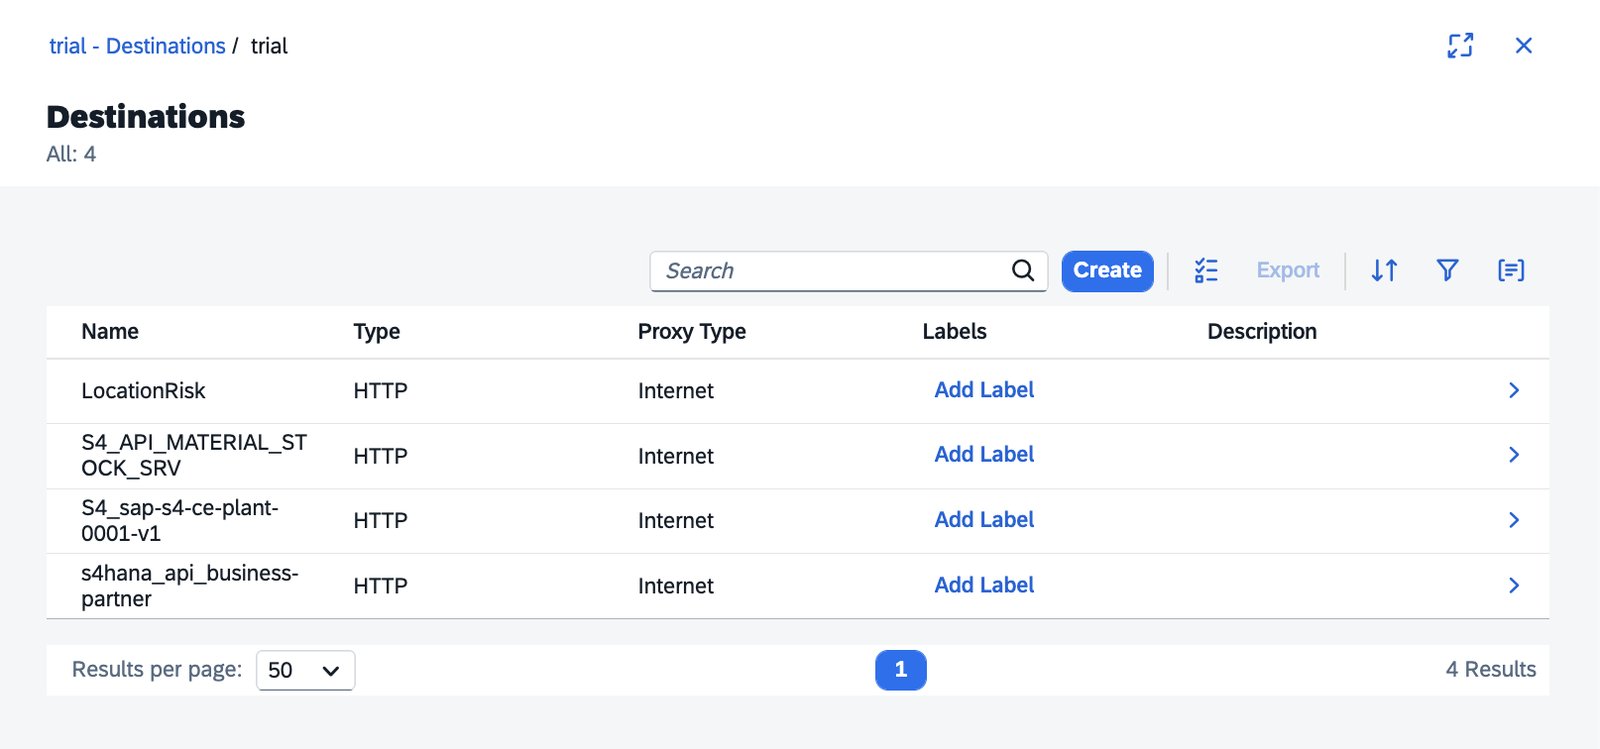
Do not forget IntegrationCell.Include = true. Without it, the destination will not appear when you create the Business Data Graph.
▸ Create destination for API Composition Navigator (Try Out)
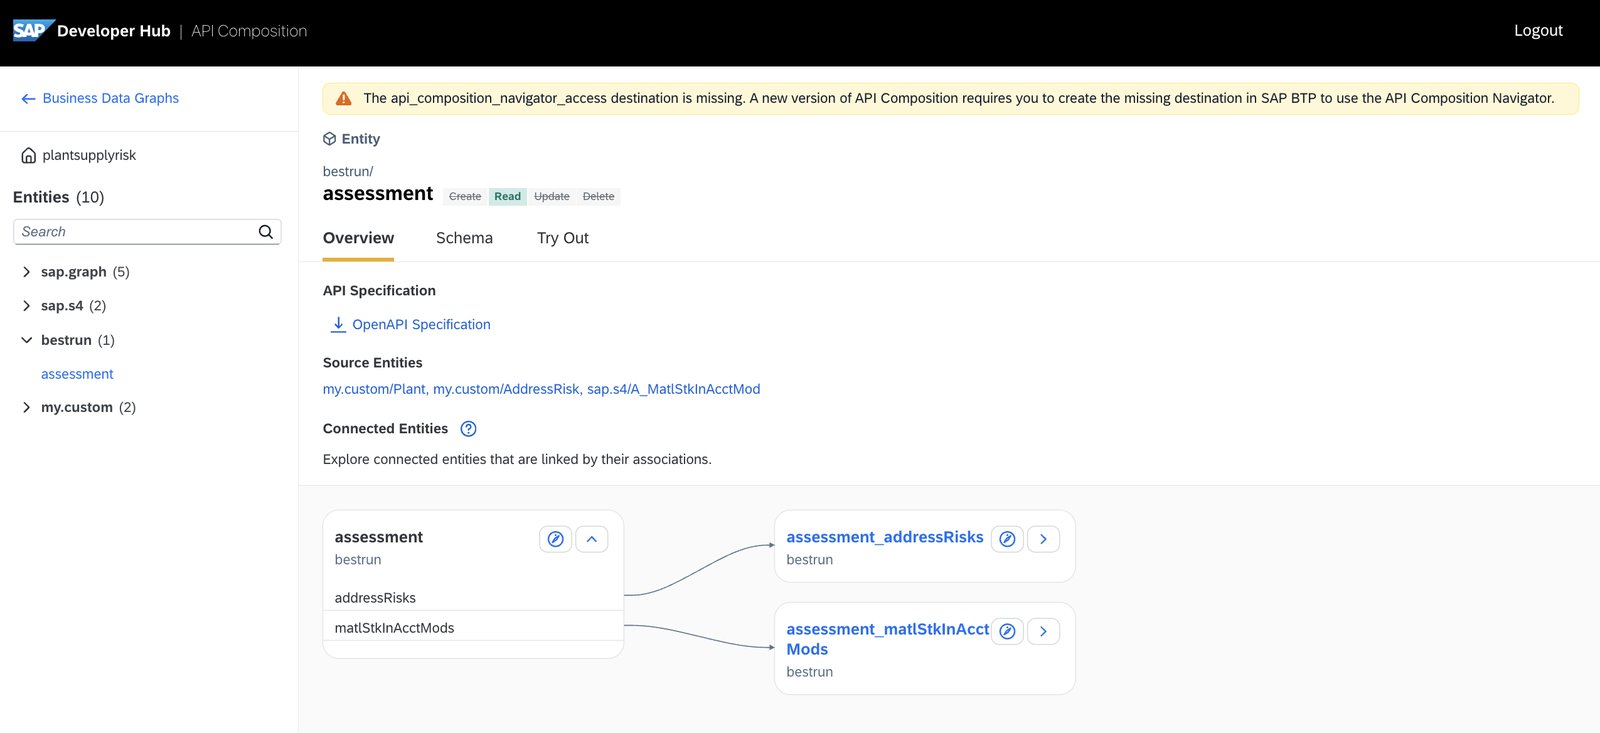
The new version of API Composition needs one more destination, otherwise the Try Out tab of API Composition Navigator shows “The api_composition_navigator_access destination is missing”. This destination is only for Try Out; the MCP Server works without it.
Step 1. Create a service instance of SAP Process Integration Runtime with Client Credentials. Your subaccount must have Cloud Foundry enabled. Go to BTP Cockpit → Services → Instances and Subscriptions → Create:
Service: SAP Process Integration RuntimePlan: integration-flowInstance Name: api-composition-navigatorGrant Type: Client CredentialsRoles: ESBMessaging.send
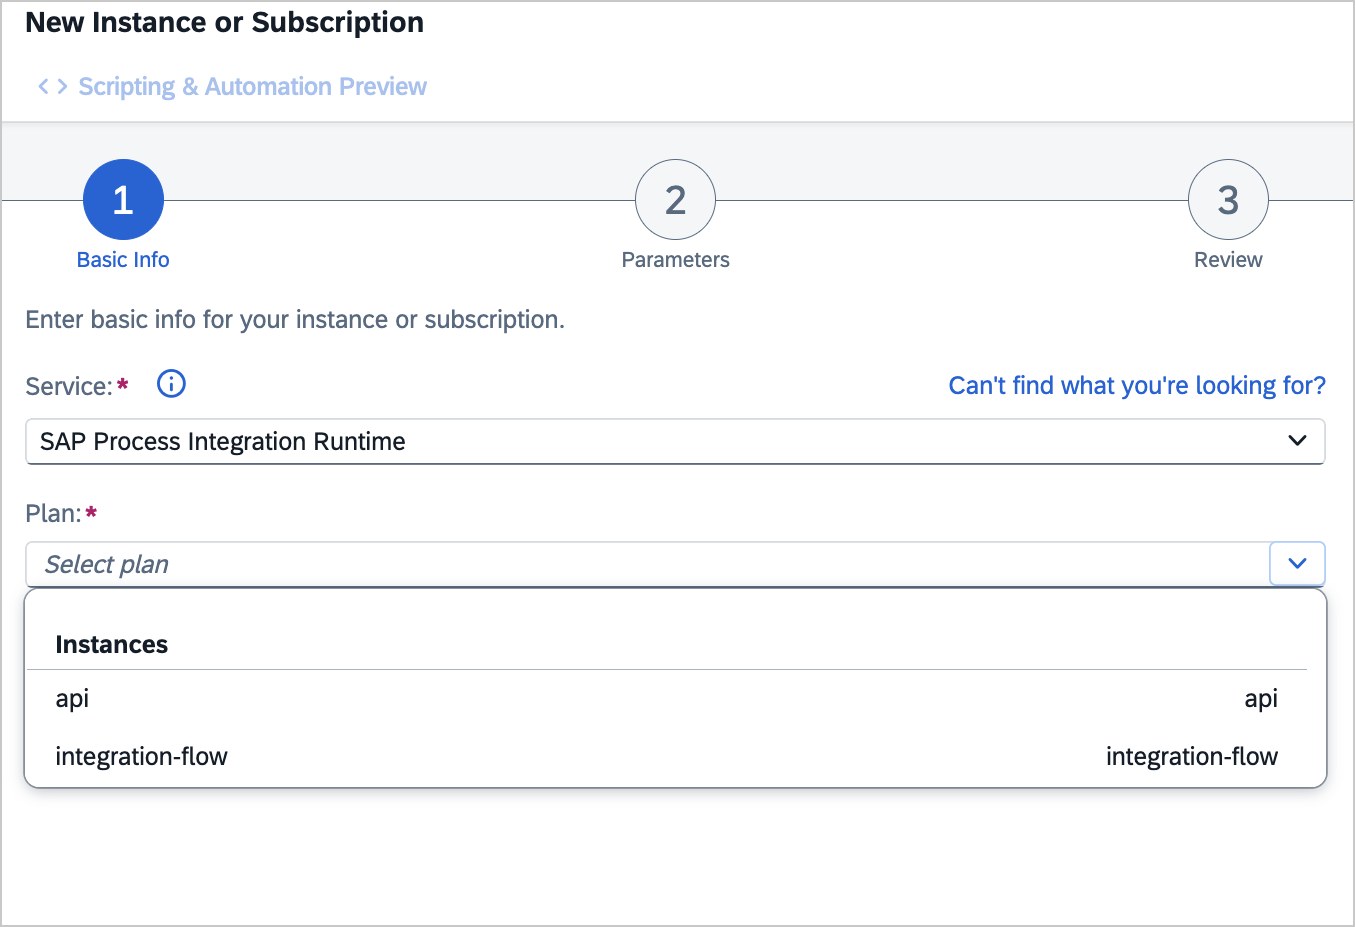
Choose plan integration-flow, NOT api. The Business Data Graphs page also warns that the api plan of API Composition can no longer be used. The roles of the api plan (AuthGroup_…, B2bInterchange…) are not related to the graph.
Step 2. Create a service key: click … next to the new instance → Create Service Key → name navigator-key → Create. Open the key and note these 3 values:
oauth.clientidoauth.clientsecretoauth.tokenurl
Step 3. Create the destination: Connectivity → Destinations → Create → From Scratch:
| Field | Value |
|---|---|
| Name | api_composition_navigator_access |
| Type | HTTP |
| Proxy Type | Internet |
| URL | https://<API Composition tenant domain>/graph – take the host from the OData URL of the Business Data Graph |
| Authentication | OAuth2ClientCredentials |
| Client ID | oauth.clientid from the service key |
| Client Secret | oauth.clientsecret from the service key |
| Token Service URL | oauth.tokenurl from the service key, keep as is |
| Token Service URL Type | Dedicated |
Step 4. Open API Composition Navigator again → plantsupplyrisk → assessment. The yellow banner about the missing destination must be gone, and Try Out now works.
If you cannot create this destination yet, you can still continue. The OpenAPI Specification download and the MCP Server do not need it; real data is checked later with MCP Inspector.
▸ Create Business Data Graph
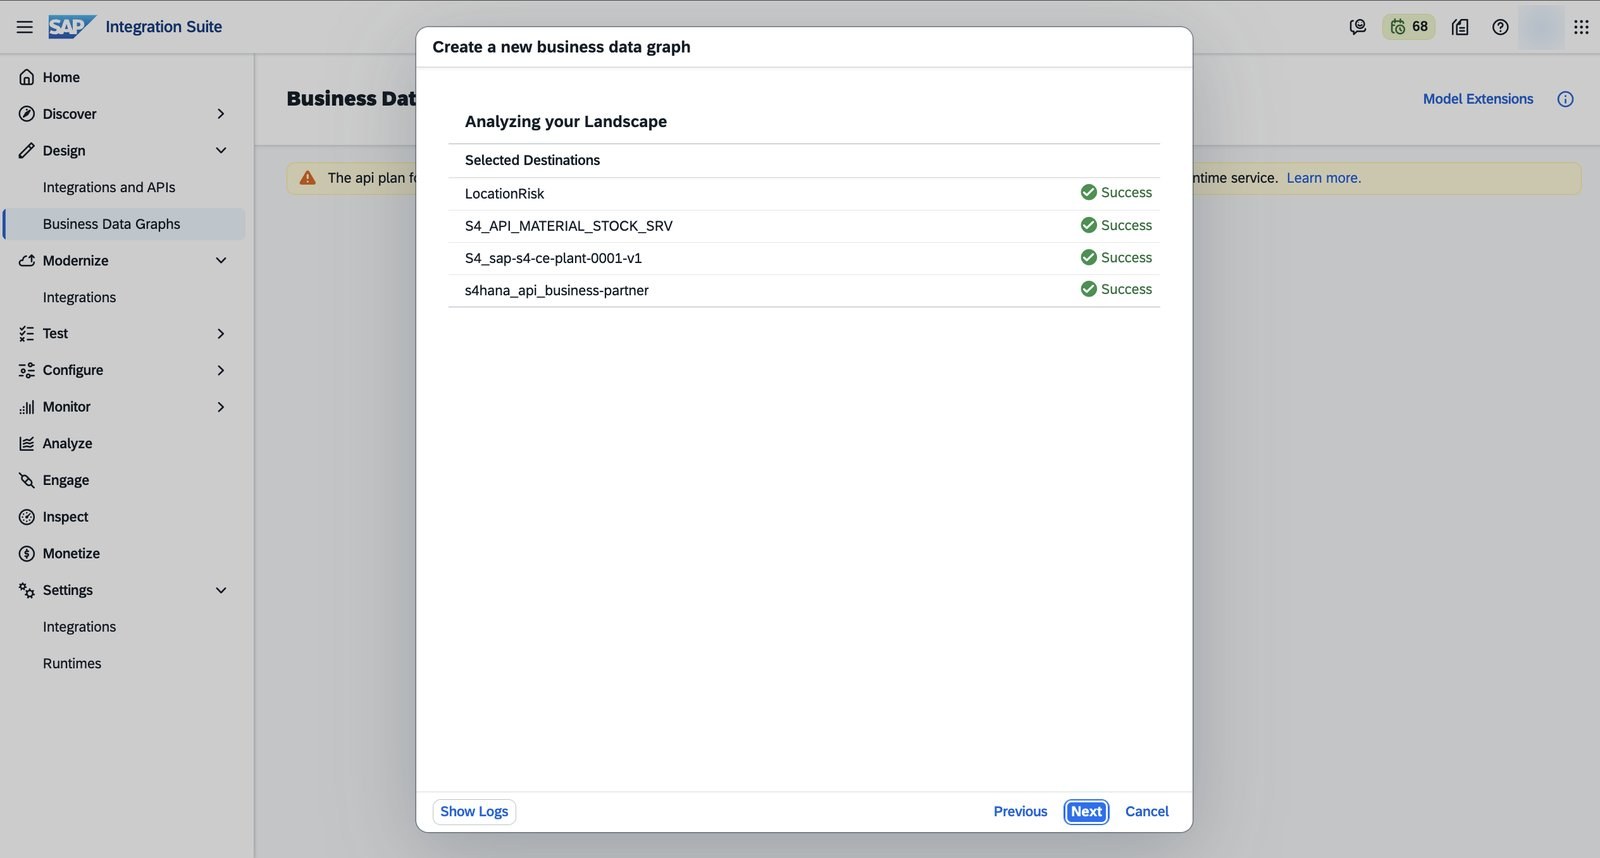
Go to Design → Business Data Graphs → Create, ID plantsupplyrisk, tick all 4 destinations and keep Enable OData Containment. Wait until all 4 sources show Success.
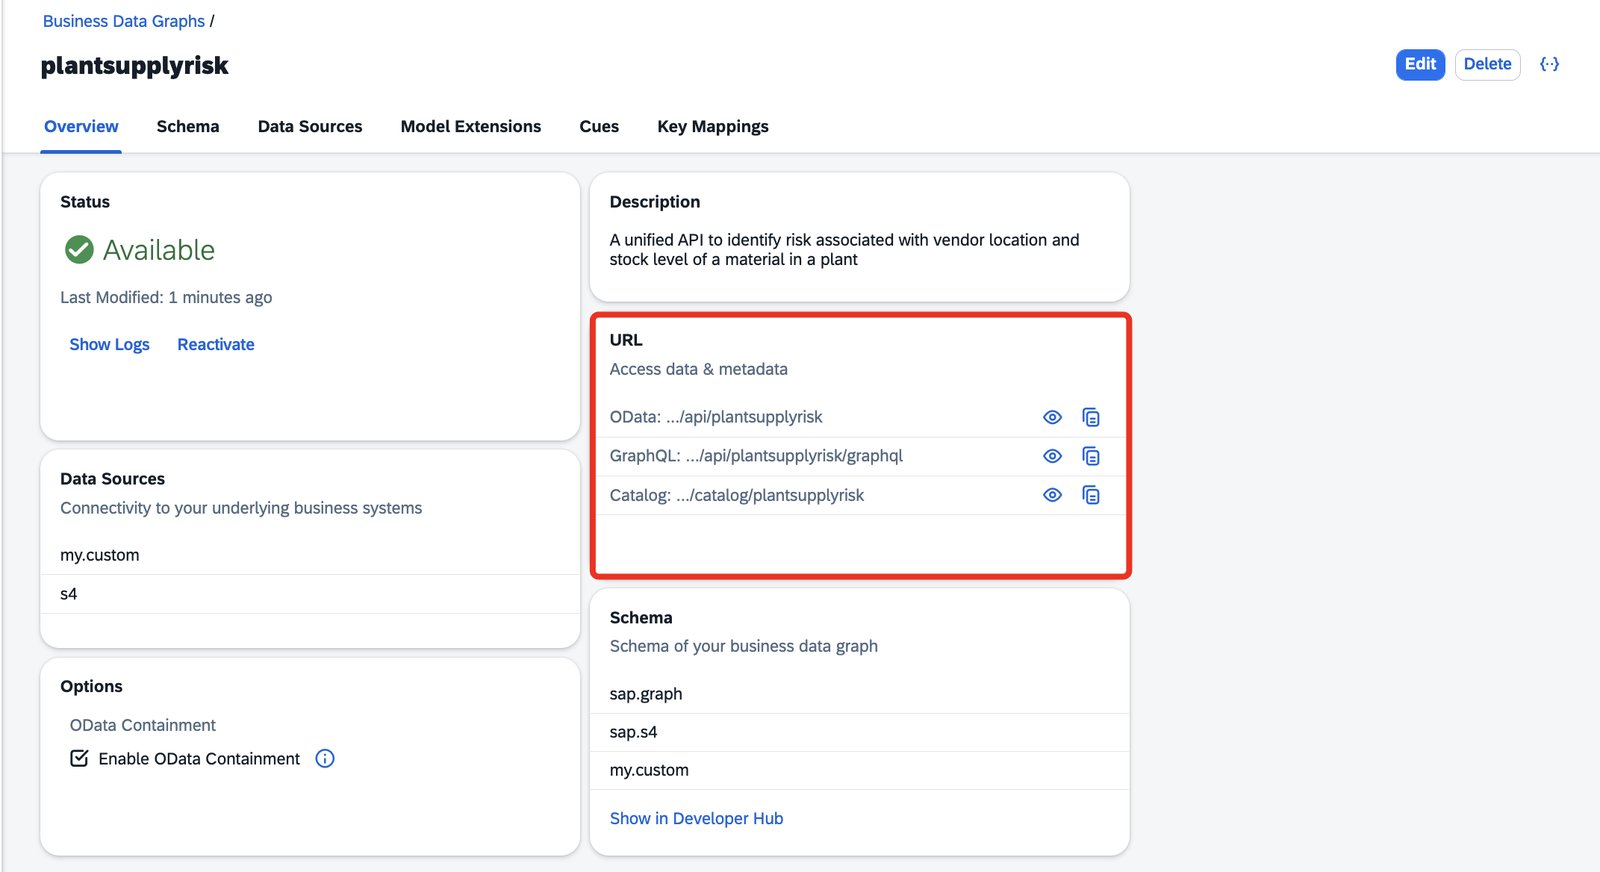
Click Activate. The graph becomes Available with 3 URLs: OData, GraphQL and Catalog.
▸ Create Model Extension and Custom Entity
The custom entity is the business view the agent will use: one plant has many address risks and many stock lines.
Step 1. On the Business Data Graphs page, click Model Extensions (top right) → Create → New Model Extension:
Name: plantsupplyrisk-extensionDescription: A unified Model to identify the risk associated with vendor location and stock level of a material in a plant.Use metadata from business data graph: plantsupplyrisk
Step 2. Tab Custom Entities → Create a custom entity. Name bestrun.assessment, untick Read-only → Next.
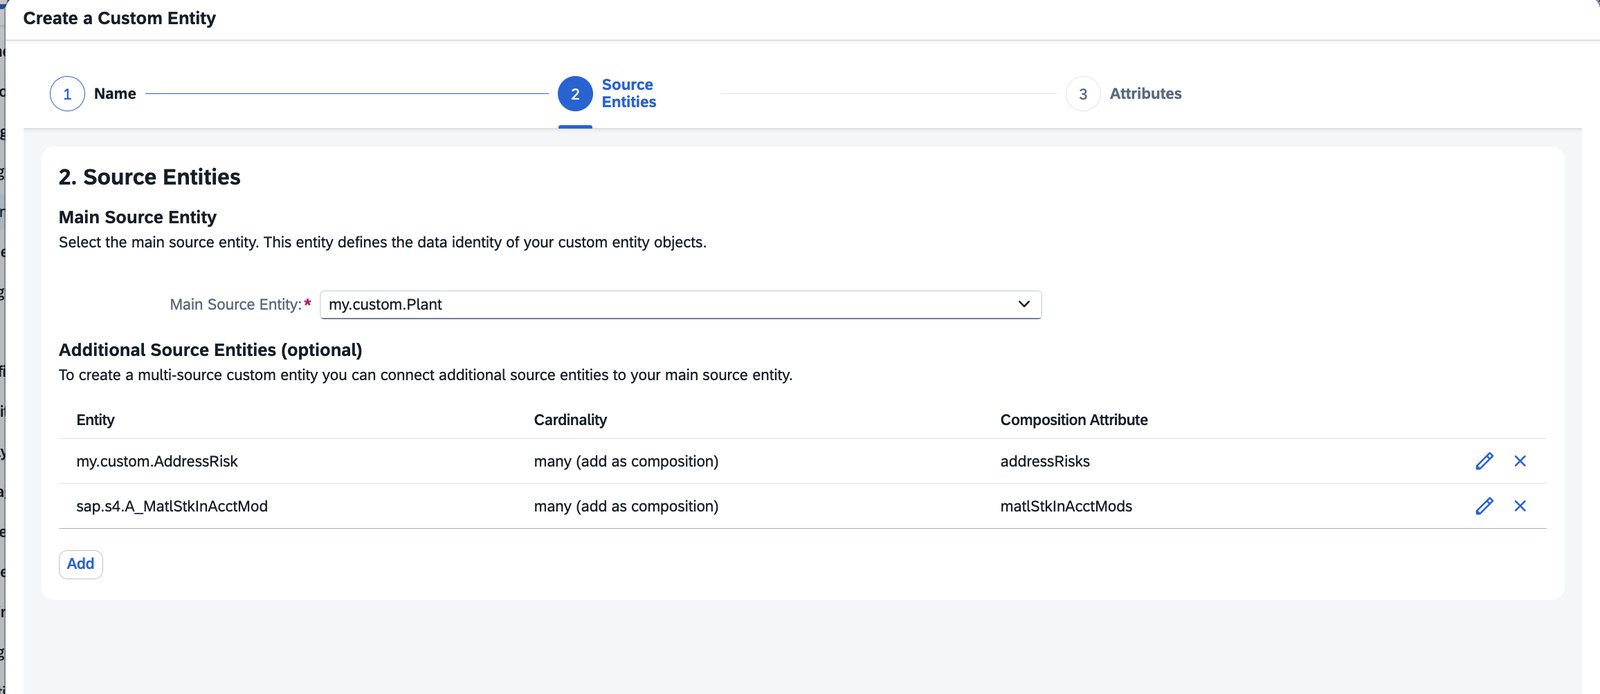
Step 3. Set Main Source Entity = my.custom.Plant. Click Add to add 2 additional sources:
| Additional source | Join key | Cardinality | Composition |
|---|---|---|---|
my.custom.AddressRisk | AddressId | many | addressRisks |
sap.s4.A_MatlStkInAcctMod | Plant | many | matlStkInAcctMods |
Step 4. On the Attributes screen, tick the attributes below and set the new name in column Add as:
| Source entity | Attributes → Add as |
|---|---|
my.custom.Plant | Plant → id, PlantName → plantName |
my.custom.AddressRisk | AddressId → addressId, RiskFactor → riskFactor, RiskCategory → riskCategory, RiskScore → riskScore, RiskTrend → riskTrend, RiskScope → riskScope |
sap.s4.A_MatlStkInAcctMod | Material → material, StorageLocation → storageLocation, Batch → batch, Supplier → supplier, Customer → customer, WBSElementInternalID → wbsElementInternalID, SDDocument → sdDocument, SDDocumentItem → sdDocumentItem, InventorySpecialStockType → inventorySpecialStockType, InventoryStockType → inventoryStockType, MatlWrhsStkQtyInMatlBaseUnit → matlWrhsStkQtyInMatlBaseUnit |
Do not tick Plant of
A_MatlStkInAcctMod, because this field already exists on the main entity.
Step 5. Click Create → Apply. Back on the Model Extensions page, when you see bestrun.assessment in the list, click Save.
▸ Attach Model Extension and copy the OData URL
- Go to Design → Business Data Graphs → open
plantsupplyrisk. The graph switches back to Draft. - Tab Model Extensions → Edit → Add a Model Extension → choose the extension created above → Apply.
- Click Activate → Update. The status must be back to Available, and the Schema section now has the namespace
bestrun. - Copy the OData URL on the Overview page and save it to a notepad. You will need it when creating the MCP Server.
▸ Download OpenAPI specification
Open API Composition Navigator → plantsupplyrisk → bestrun → assessment and click OpenAPI Specification.
▸ Test with Try Out
Test right away: tab Try Out → $expand → tick addressRisks and matlStkInAcctMods → Run. The query is:
/bestrun/assessment?$top=1&$expand=addressRisks,matlStkInAcctMods
The result must be 200 OK with plant data plus its risks and stock, for example:
"id": "my.custom~0010","plantName": "Berlin","addressRisks": [ { "riskFactor": "ground transport interruption", "riskCategory": "low", "riskScore": "0.1" } ],"matlStkInAcctMods": [ { "material": "Brake Pad", "storageLocation": "0010", "supplier": "Windmill Components", "matlWrhsStkQtyInMatlBaseUnit": 10 } ]
Try Out says “The api_composition_navigator_access destination is missing”? The destination for API Composition Navigator is not created yet. Do the section Create destination for API Composition Navigator (Try Out) above and reload the page. In a hurry? Skip this test: the OpenAPI Specification button and the MCP Server do not need this destination, and real data is checked later with MCP Inspector.
Create the MCP Server
▸ Create MCP Server artifact
Step 1. Go to Design → Integrations and APIs → Create a new package → Save:
Name: plant-supply-risk-packageShort Description: MCP artifacts from the plant supply risk graphVersion: 1.0
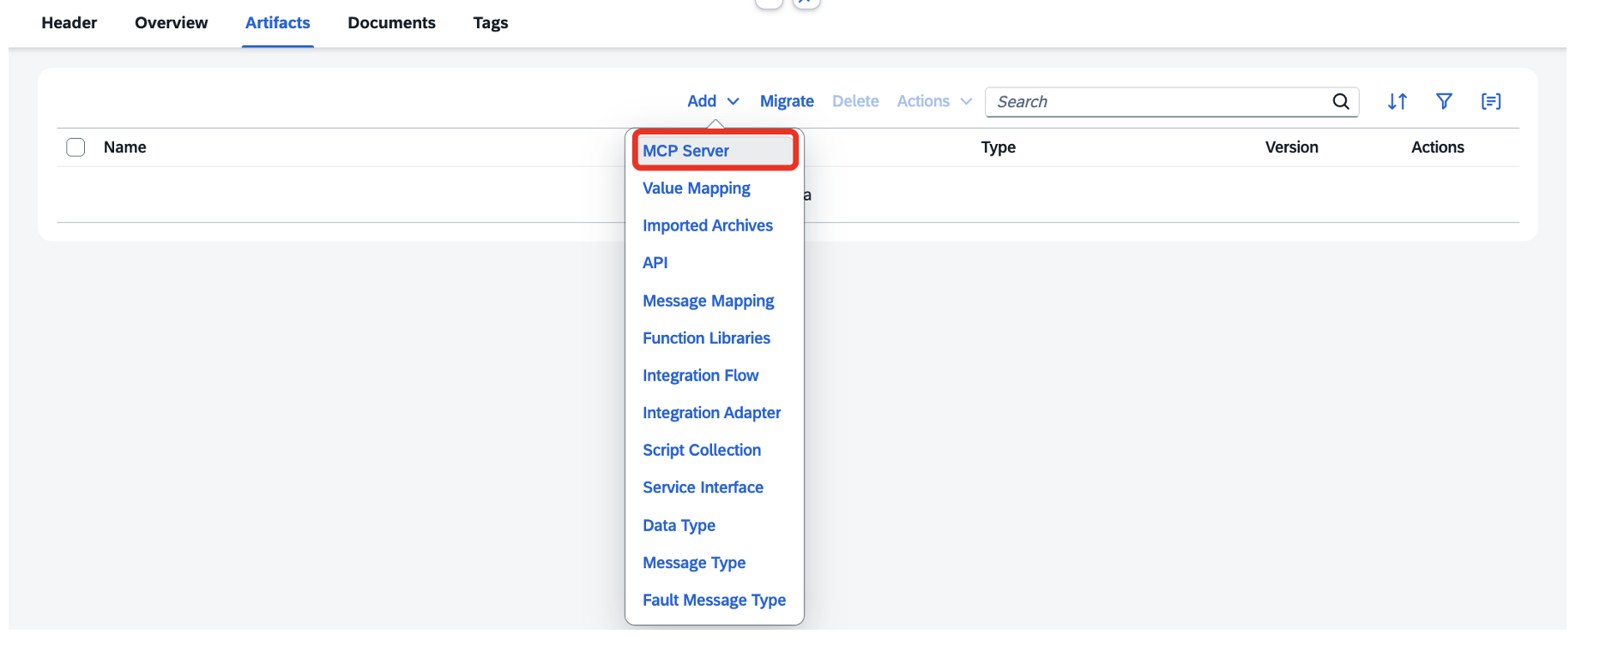
Step 2. In the package, tab Artifacts → Add → MCP Server. If you do not see MCP Server, check your Integration Suite plan in the Prerequisites.
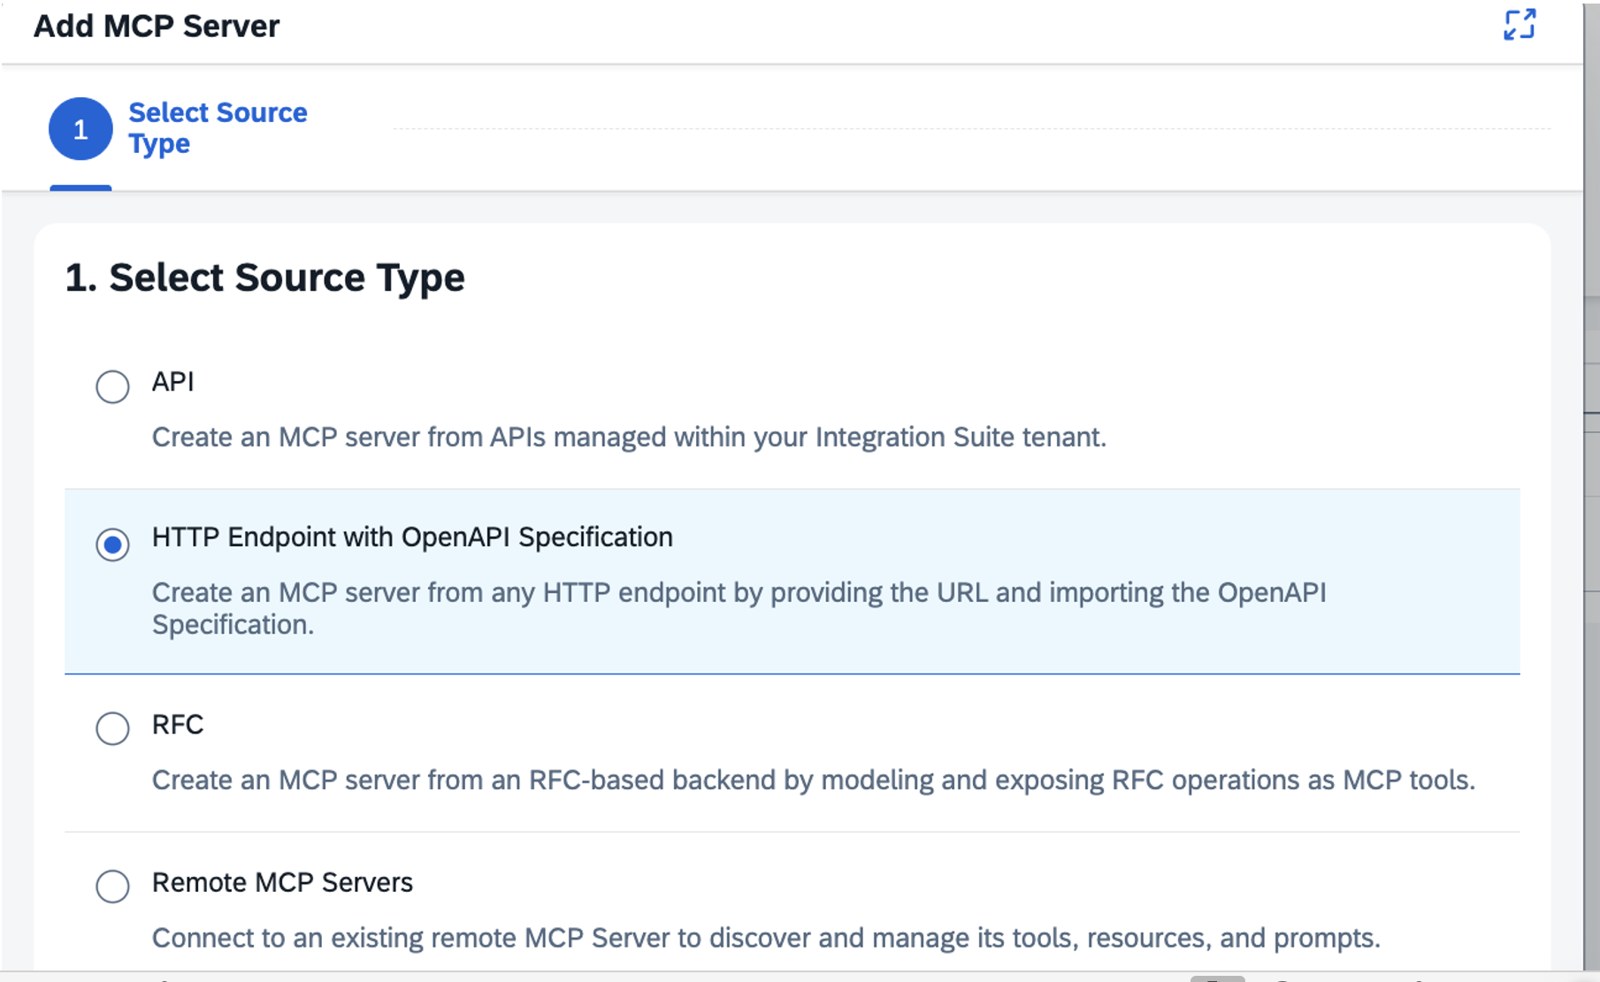
Step 3. On Select Source Type, choose HTTP Endpoint with OpenAPI Specification → Next.
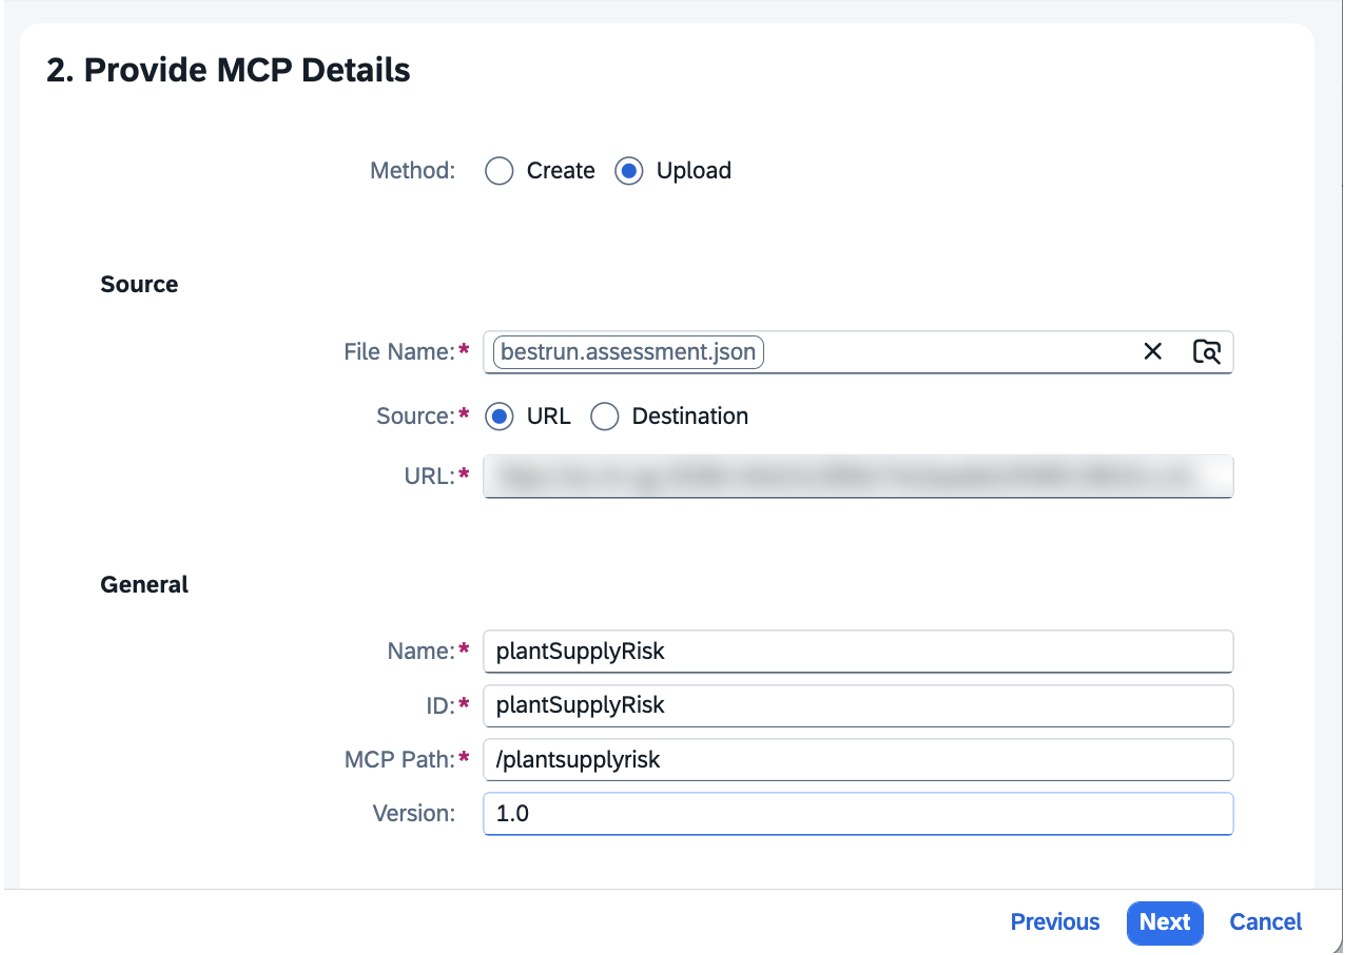
Step 4. Provide the MCP Server details:
| Field | Value |
|---|---|
| Method | Upload |
| File Name | The OpenAPI file downloaded from API Composition Navigator |
| Source | URL |
| URL | The OData URL copied from the Business Data Graph |
| Name / ID | plantSupplyRisk |
| MCP Path | /plantsupplyrisk |
| Version | 1.0 |
Step 5. On Select Tools, the wizard reads the OpenAPI file and lists each operation as a tool. Tick only these 4 tools → Add:
| Method | Path | Purpose |
|---|---|---|
| GET | /bestrun/assessment | List of plants |
| GET | /bestrun/assessment/{id} | One plant |
| GET | /bestrun/assessment/{id}/addressRisks | Address risks of a plant |
| GET | /bestrun/assessment/{id}/addressRisks/{addressId}… | One specific risk |
Choose tools by business question, not all of them. The more tools an agent has, the more often it calls the wrong one and the more tokens it burns. List the questions users will ask first, then pick only the tools needed to answer them.
▸ Check security policies and deploy
Step 1. On the MCP Server page, open tab Policies. A default processing chain is already created:
| Component | Role |
|---|---|
| MCP Sender Adapter | Entry point: opens the MCP endpoint and receives requests from the agent |
| Authentication | Authenticates the caller. Supports Basic, OAuth 2.0, Client Certificate, External OAuth (OIDC) with Entra ID, Google, Okta |
| Authorization | Checks whether the caller is allowed to call |
| HTTP Receiver Adapter | Forwards the request to the backend and returns the result |
Step 2. Click policy Authorization 1 and read tab Policy Settings. By default the agent can call when it has OAuth scope API.invoke or a valid Developer Key:
Authorization Type: OAuth Scope or Developer KeyScope Key: scopeScope: API.invoke
Step 3. Other policies you can add: Quota and Spike Arrest to protect the backend from overload, request validation, payload attack protection and format conversion. This lab keeps the defaults.
Step 4. Back to tab Overview → Deploy (top right). Runtime Profile = Integration Cell, Virtual Host is filled automatically → Yes.
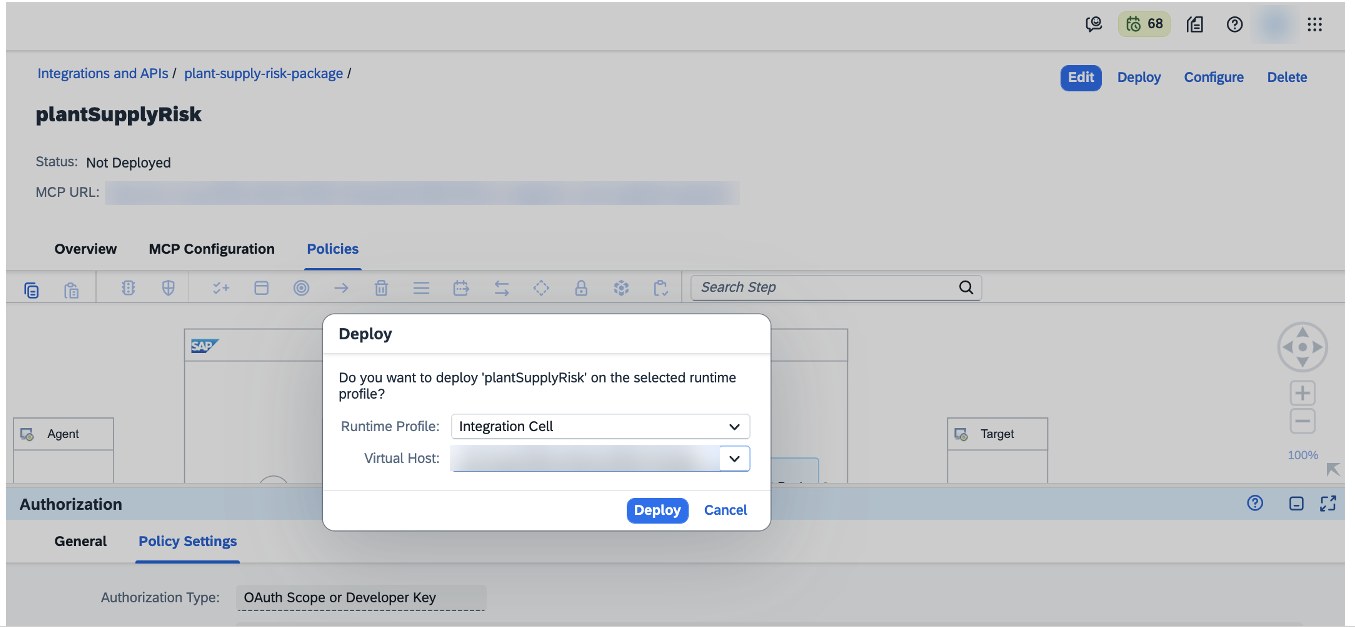
Step 5. Note the MCP URL on the page. It looks like:
https://<virtual-host>/plantsupplyrisk
Publish on Developer Hub
▸ Publish the MCP Server as a product
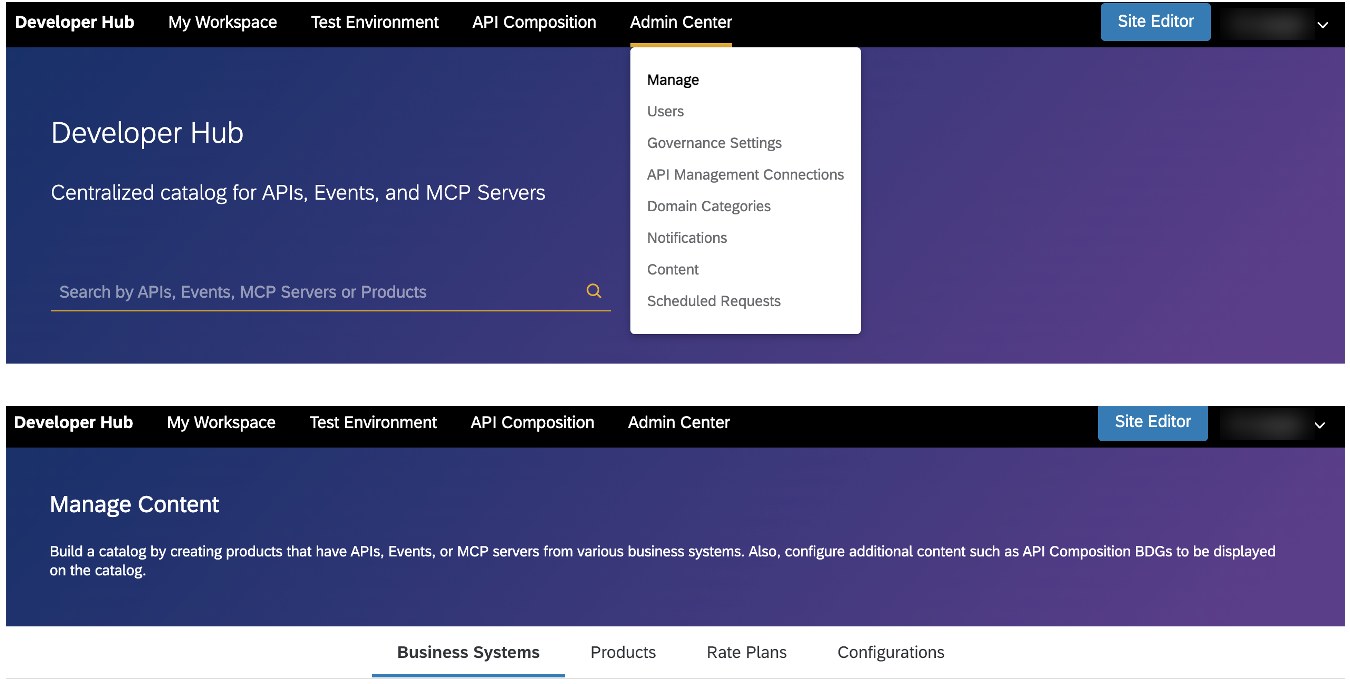
Step 1. Click ⠿ → Developer Hub → Admin Center → Content → tab Business Systems → choose the business system of your Integration Suite.
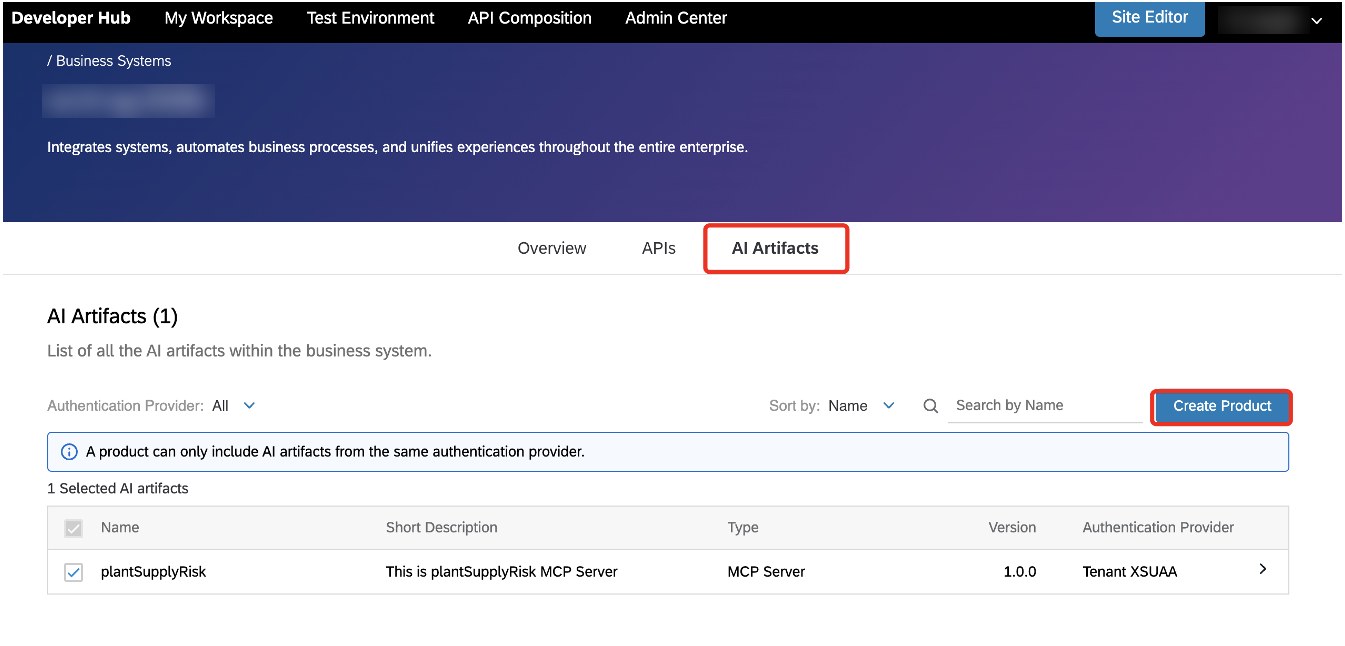
Step 2. Open tab AI Artifacts (older tutorials call it MCP Servers) → tick plantSupplyRisk → Create Product:
Name / ID: PlantSupplyRiskDescription: Get real-time visibility into plant supply risks and potential disruptions across the supply chain
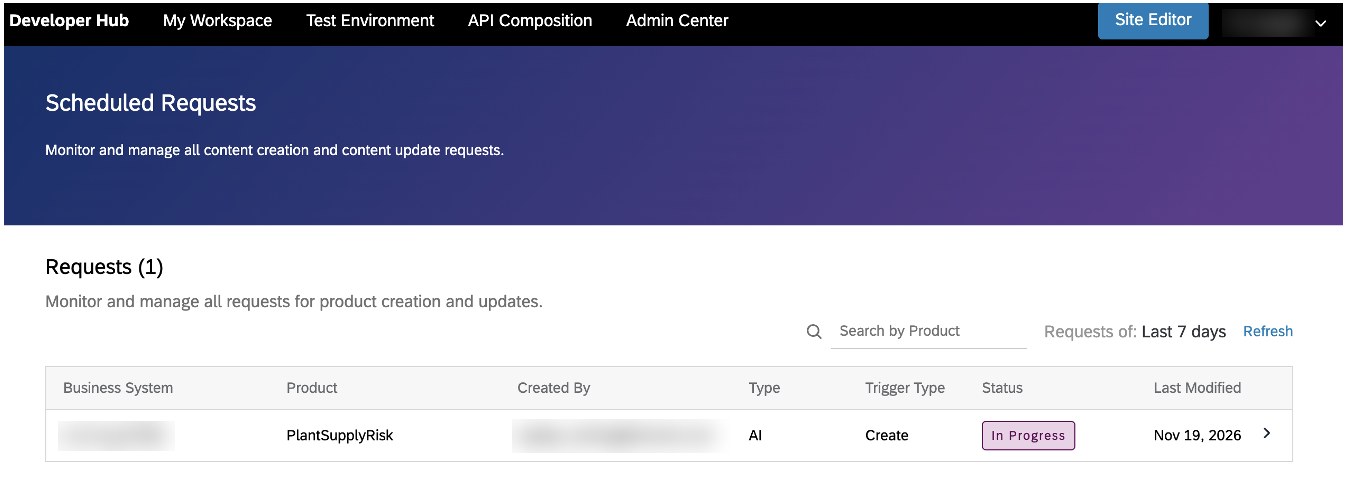
Step 3. Click Publish. The system generates the description with AI in the background. Track it in Admin Center → Scheduled Requests and wait for status Success.
▸ Subscribe for the agent and get credentials
Step 4. Go back to the Developer Hub home page, open product PlantSupplyRisk → Subscribe → Create New Subscription for Agent:
Name: Plant Supply Risk AgentDescription: Select most reliable supplier for each material and location

Step 5. Wait a few minutes. Go to My Workspace → Subscriptions → Agents → open Plant Supply Risk Agent. In section Credentials, copy 3 values: Token URL, Key (client ID) and Secret (client secret). Click the eye icon to show the values; each line has a copy button.
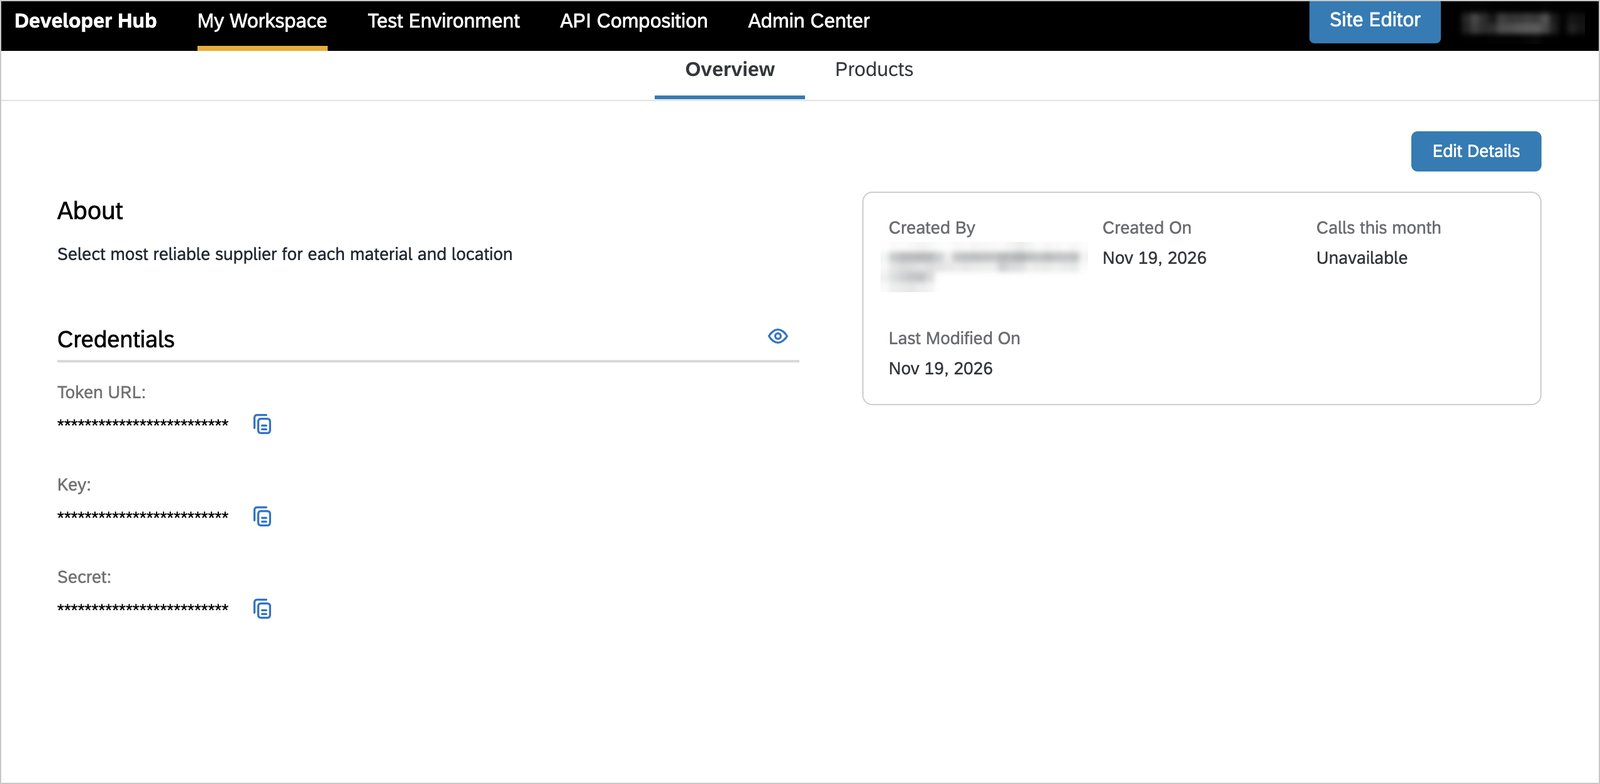
Keep Key and Secret private. Anyone who has them can call the tools as the agent. Never paste them into team chats, slides or Git. Create one subscription per agent so you can revoke each one separately.
TESTING
Test with MCP Inspector
▸ Get access token
curl -X POST "<TOKEN_URL>" \ -H "Content-Type: application/x-www-form-urlencoded" \ -d "grant_type=client_credentials" \ -d "client_id=<KEY>" \ -d "client_secret=<SECRET>"
The token is valid for about 3600 seconds.
▸ Connect MCP Inspector
npx @modelcontextprotocol/inspector
Add a server with transport streamable-http, URL = MCP URL, custom header Authorization: Bearer <ACCESS_TOKEN>, and untick Enterprise-managed authorization (otherwise you get Issuer mismatch). After connecting, you should see 4 tools. Run get_bestrun_assessment to list Berlin, Munich, London…, then get_bestrun_assessment_id_addressRisks to see the risk score. This is exactly what the agent sees.
Ask in natural language from Claude Desktop
▸ Auto-refresh token proxy
Because the token only lives 1 hour, I wrote a small Python proxy (standard library only, Python 3.8+):
| File | Role |
|---|---|
sap_mcp_token.py | Gets the token, caches it in ~/.cache/sap_mcp/, refreshes before expiry or on 401 |
sap_mcp_proxy.py | stdio ↔ Streamable HTTP bridge started by Claude Desktop |
sap_mcp.env | Token URL, Key, Secret, MCP URL (chmod 600) |
▸ Register in Claude Desktop
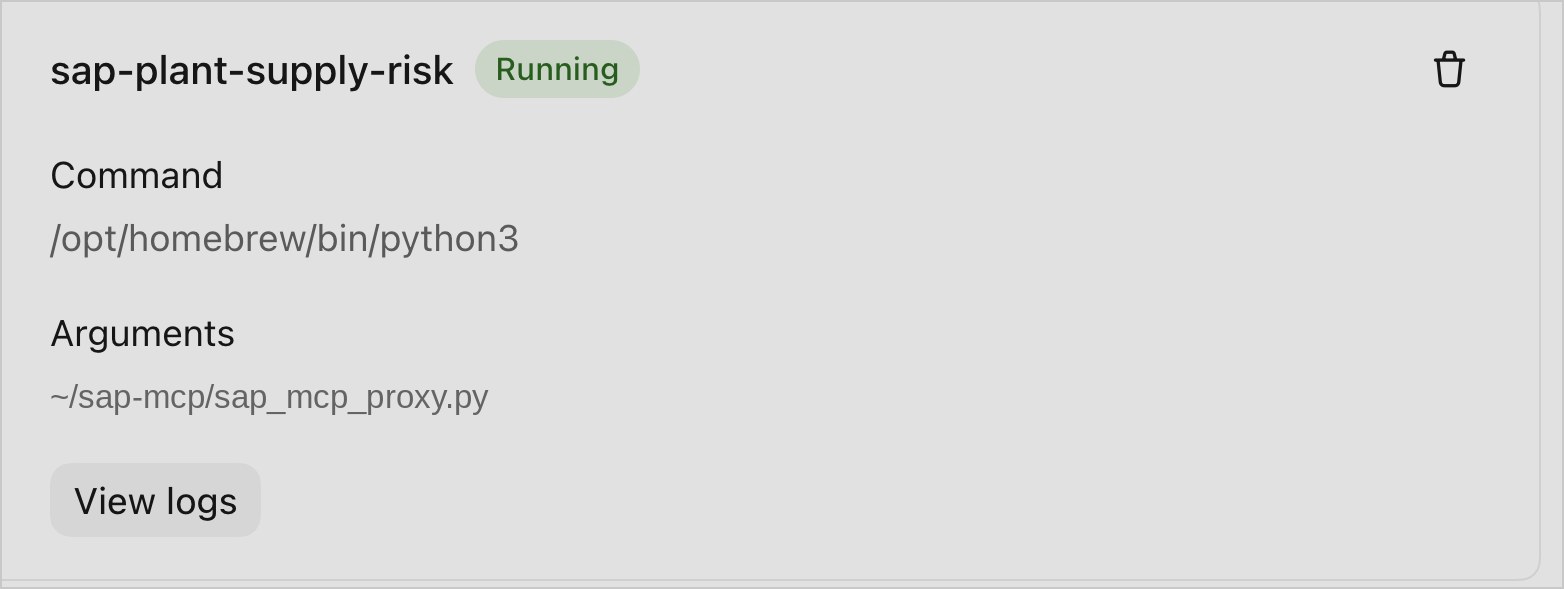
"mcpServers": { "sap-plant-supply-risk": { "command": "/opt/homebrew/bin/python3", "args": ["/Users/<you>/sap-mcp/sap_mcp_proxy.py"] }}
Quit Claude Desktop completely (Cmd + Q) and open it again. The server must be Running.
▸ Demo
Question: “Which plant is the safest to order Brake Pads from? Which one should I avoid, and why?” Claude calls get_bestrun_assessment with $expand=addressRisks,matlStkInAcctMods and answers:
| Plant | Brake Pad stock | Risk | Claude’s conclusion |
|---|---|---|---|
| Berlin | 10 | low 0.1, local | Pick: most stock, lowest risk |
| Munich | 8 | 2 medium risks 0.5 | Backup if Berlin is not enough |
| Paris | 4 | 2 medium risks 0.5, regional storm | Avoid: low stock, higher risk |
APPLY TO A REAL SYSTEM
- S/4HANA Public Cloud: Communication Arrangement for
API_MATERIAL_STOCK_SRVwith a read-only user, then a destination - On-Premise / Private Cloud: activate the service in
/IWFND/MAINT_SERVICE, expose via Cloud Connector, OnPremise destination - Get the OpenAPI file from SAP Business Accelerator Hub, choose read tools only and add a Quota policy
TROUBLESHOOTING
| Issue | Cause | Solution |
|---|---|---|
| Destination not shown when creating graph | Missing IntegrationCell.Include | Add the property = true |
| No Add → MCP Server menu | Plan not supported / API Management not enabled | Use Enhanced, Premium or Trial |
| Integration Cell Activation Failure | Activation error or region | Check KBA 3769634 |
| 401 Unauthorized | Token expired (~3600 s) | Get a new token or use the proxy |
| Connected but no tools | Tools not selected in wizard | Add tools and redeploy |
| Issuer mismatch | Enterprise-managed authorization enabled | Untick it, use Bearer header |
Navigator: api_composition_navigator_access is missing | New API Composition needs its own destination | Create it or skip Try Out |
Token URL returns invalid_client | Wrong Key/Secret or subscription deleted | Copy again from Developer Hub |
SUMMARY
In this blog, I shared how to build an MCP Server on SAP Integration Suite, from Business Data Graph to Developer Hub, and how to test it with MCP Inspector and Claude Desktop. The agent only sees the tools we allow, only holds a Developer Hub token, and every call goes through policies and central monitoring, all without writing any ABAP.
Next, I will try adding Quota, switching to External OAuth with Entra ID, and applying this to stock lookup on a real S/4HANA Public Cloud system. If you have tried MCP Server on your tenant, please share your experience in the comments.
References:
- SAP Tutorial: Create an MCP Server for Enterprise AI Agents (developers.sap.com/tutorials/integration-suite-mcp-server)
- SAP Tutorial: Build a Supply Risk API with API Composition (GitHub sap-tutorials/integration)
- SAP Tutorial: MCP Gateway in SAP Integration Suite (developers.sap.com/tutorials/btp-integration-suite-mcp-gateway)
- SAP Note / KBA 3769634 (Integration Cell), 3338820 (API Composition)
Thank you for reading!

